The DHT11 device uses simplified single-bus communication. Single-bus means there is only one data line, and all data exchange and control in the system are completed through the single bus.
Single-Bus Data Bit Definition
DATA is used for communication and synchronization between microprocessor and DHT11, adopting single-bus data format. It transmits 40-bit data at a time with higher bits coming first.
Data Format:
8bit Humidity Integer Data + 8bit Humidity Decimal Data + 8bit Temperature Integer Data + 8bit Temperature Decimal Data + 8bit Checksum.Note: The humidity decimal part is 0.
Checksum Data Definition
The 8bit checksum equals the last 8 bits of the result of “8bit Humidity Integer Data + 8bit Humidity Decimal Data + 8bit Temperature Integer Data + 8bit Temperature Decimal Data”.
Example 1: The received 40-bit data is:
According to the DHT11 data format provided, organizing the 40-bit data into a table with 5 columns and 2 rows:
| Humidity Integer | Humidity Decimal | Temperature Integer | Temperature Decimal | Checksum |
|---|---|---|---|---|
| 00110101 | 00000000 | 00011000 | 00000100 | 01010001 |
Checksum Calculation:
0011 0101+0000 0000+0001 1000+0000 0100= 0101 0001Timing Diagram

Implementation Steps
Step 1
After powering on, DHT11 needs to wait for 1-2 seconds before starting to work. So wait for 2 seconds initially.
loop {
        delay.delay_millis(2000);
        //...
}
Step 2
Set the microprocessor’s IO pin to output low level, and this low level needs to be held for at least 18ms.
let _ = self.dht.pin.set_low();
self.dht.delay.delay_ms(18);
let _ = self.dht.pin.set_high();
Step 3
After receiving the above low level, DHT11 will wait for the low level to end, then enter high level again. The waiting time is approximately 40 to 50 microseconds (some C implementations use 40 microseconds, while Rust implementations use 48 microseconds).
self.dht.delay.delay_us(48);Then it outputs a low level signal for 83 microseconds as a response signal. Following that, it outputs a high level signal for 87 microseconds to notify the microprocessor that data is ready to be received.
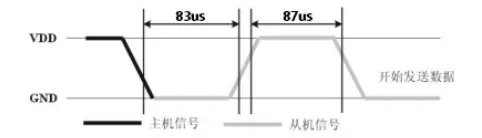
When receiving data, first wait for the end of the “83 microseconds low level”, then wait for the end of the “87 microseconds high level”.
let _ = self.dht.wait_until_state(PinState::High);
let _ = self.dht.wait_until_state(PinState::Low);
The wait_until_state implementation is as follows:
 pub fn wait_until_state(&mut self, state: PinState) -> Result<(), SensorError> {
        for _ in 0..DEFAULT_MAX_ATTEMPTS {
            let is_state = match state {
                PinState::Low => self.pin.is_low(),
                PinState::High => self.pin.is_high(),
            };

            match is_state {
                Ok(true) => return Ok(()),
                Ok(false) => self.delay.delay_us(1),
                Err(_) => return Err(SensorError::PinError),
            }
        }

        Err(SensorError::Timeout)
    }
Then enter the data reception phase.
Step 4
In the data reception phase, the data length is 40 bits, which corresponds to the 5 bytes listed above. Among them:
- Bit data “0” is represented as: 54 microseconds of low level and 23-27 microseconds of high level.
- Bit data “1” is represented as: 54 microseconds of low level and 68-74 microseconds of high level.
Alternatively, consider the 54-microsecond low level as a separator.
Every byte of data has 8 bits, so 8 loops are needed.
    let mut byte: u8 = 0;
    for n in 0..8 {
        // Wait for the arrival of high level
        match self.wait_until_state(PinState::High) {
            Ok(_) => {}
            Err(err) => return Err(err),
        };
        // Detect the duration of the high level
        self.delay.delay_us(30);
        // If it's still high level at this moment, this bit is 1, because the high level duration is greater than 30 microseconds
        // If it's low level now, this bit is 0, because the high level duration is less than 30 microseconds
        let is_bit_1 = self.pin.is_high();
        if is_bit_1.unwrap() {
            // Set this bit to 1 using bitmask
            let bit_mask = 1 << (7 - (n % 8));
            byte |= bit_mask;
            // Wait for the arrival of low level, preparing for next bit reading
            match self.wait_until_state(PinState::Low) {
                Ok(_) => {}
                Err(err) => return Err(err),
            };
        }
    }
As mentioned before, the received data has 40 bits, except the last 8 bits which are the checksum, the others are data bits. Therefore, 5 loops of the above code are needed to read 5 bytes of data.
// The read_byte method implements the logic above
let humidity_integer = read_byte()?;
let humidity_decimal = read_byte()?;
let temperature_integer = read_byte()?;
let temperature_decimal = read_byte()?;
let checksum = read_byte()?;
Data Verification If the sum of the first 32 bits of data matches the checksum, the data is correct.
 let sum = humidity_integer
    .wrapping_add(humidity_decimal)
    .wrapping_add(temperature_integer)
    .wrapping_add(temperature_decimal);
if sum != checksum {
    return Err(SensorError::ChecksumMismatch);
}
At this point, the data reception is complete.