Hardware
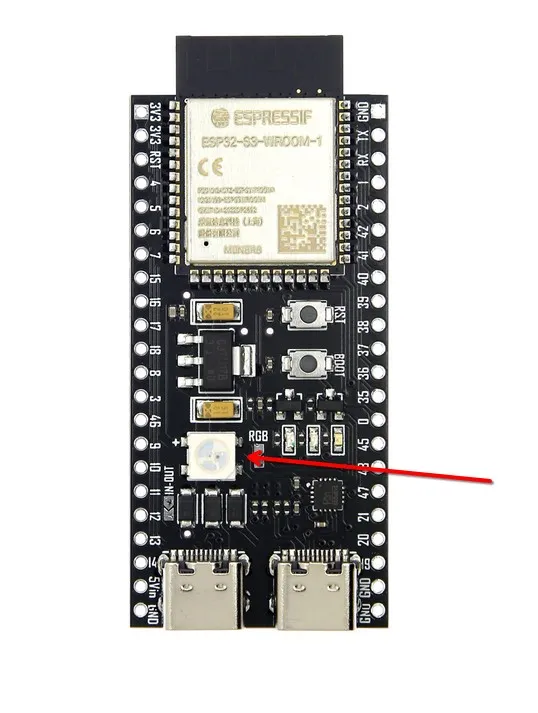
My hardware is an esp32s3.
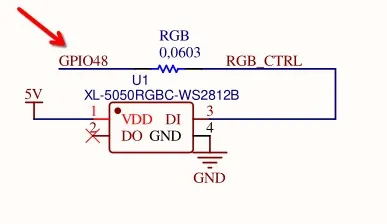
There is a ws2812 LED connected to GPIO 48.
Hardware image:
Circuit diagram:
Our goal is to light it up.
Implementation in C
Implementing this in C is simple because the ESP32 ecosystem is well-established.
#include <stdio.h>
#include "freertos/FreeRTOS.h"
#include "freertos/task.h"
#include "driver/gpio.h"
#include "sdkconfig.h"
#include "esp_log.h"
#include "led_strip.h"

static const char *TAG = "main";

#define GPIO_NUM_48 48

led_strip_handle_t led_flash_init(void) {
    // Initialize LED strip
    led_strip_config_t led_cfg = {
        .strip_gpio_num = GPIO_NUM_48,
        .max_leds = 1,
        .flags.invert_out = false,
        .led_model = LED_MODEL_WS2812,
    };

    // led strip backend config rmt
    led_strip_rmt_config_t rmt_cfg = {
        .clk_src = RMT_CLK_SRC_DEFAULT,
        .resolution_hz = (10*1000*1000),
        .flags.with_dma = false,
    };

    led_strip_handle_t led_strip = NULL;
    led_strip_new_rmt_device(&led_cfg, &rmt_cfg, &led_strip);
    ESP_LOGI(TAG, "LED strip initialized");
    return led_strip;
}


void app_main(void)
{

    led_flash_init();
    ESP_LOGI(TAG, "Starting");
    led_strip_handle_t led_strip = led_flash_init();
    bool led_on_of = false;

    // Set brightness
    uint8_t brightness = 50;
    uint8_t red = (0 * brightness) / 100;
    uint8_t green = (0 * brightness) / 100;
    uint8_t blue = (139 * brightness) / 100;

    while (1)
    {
        if (led_on_of)
        {
             led_strip_set_pixel(led_strip, 0, red, green, blue);
             led_strip_refresh(led_strip);
             ESP_LOGI(TAG, "LED on");
        }else {
            led_strip_clear(led_strip);
            ESP_LOGI(TAG, "LED off");
        }
        led_on_of = !led_on_of;
        vTaskDelay(pdMS_TO_TICKS(500));
    }

}
C uses the official led_strip library. Of course, the project must use the official template.
Implementation in Rust
The Rust development requires more toolchain components. Here are some of the essential parts, without considering command repetition:
# Espressif toolchain
cargo install cargo-espflash espflash # Newer debugging now recommends using probe-rs
# debian/ubuntu
sudo apt install llvm-dev libclang-dev clang
However, it’s better to use esp-generate.
Creating a project. This command downloads the relevant toolchain according to the actual chip and creates the project.
esp-generate --chip esp32s3 -o alloc -o vscode -o wokwi -o esp-backtrace -o log led

# or use probe-rs
esp-generate --chip esp32s3 -o alloc -o vscode -o wokwi -o probe-rs led
Currently, it’s recommended to use probe-rs, which is an embedded debugging and target interaction toolkit. It enables users to program and debug microcontrollers via a debug probe.
The above command requires good luck domestically. If you’re unlucky, you might get stuck at the espup toolchain download stage. You can install ESP-related toolchains yourself using espup install.
Different series of ESP32 chips have different targets. For example, C-series chips appear to use the RISC-V architecture, whereas S3 uses xtensa-esp32s3-none-elf.
Remember when installing the Rust development environment, did it prompt you to run source $HOME/.cargo/env?
After installing with espup, you’ll need to do this too, otherwise the Rust tools will look for their own Rust runtime environment.
For example, mine:
source /home/kkch/export-esp.shESP32 has two runtime environments in Rust: one is std and the other is no_std.
Officially, no_std is recommended. Personally, I think although std is more convenient, for resource-constrained platforms like ESP32, std isn’t necessarily easier to use.
The official maintained version is the no_std version. The std version appears to be maintained by the community.
| Repository | Description | Support Status |
|---|---|---|
| esp-rs/esp-hal | no_std | Officially maintained |
| esp-rs/esp-idf-hal | std | Community maintained |
Official documentation typically includes examples using std. However, I’m implementing the no_std version here.
To control the LED with Rust, you’ll need the following crates:
[dependencies]
esp-hal = { version = "~1.0", features = ["esp32s3"] }
anyhow      = {version = "=1.0.100", default-features = false}
esp-bootloader-esp-idf = { version = "0.4.0", features = ["esp32s3"] }
critical-section = "1.2.0"
esp-alloc        = "0.9.0"
rtt-target       = "0.6.2"
blinksy-esp = {version = "0.11.0",features = ["esp32s3"]}
blinksy = "0.11.0"
Most of these are generated by esp-generate. The crate for controlling WS2812 requires the no_std version. I chose blinksy for this purpose.
If you’re using the
stdenvironment, another option is thews2812-esp32-rmt-drivercrate.
Blinksy is a library for controlling LED matrix layouts. It happens to support WS2812 lights and ESP platforms. It supports 1D, 2D, and 3D LED arrays.
My ESP32S3 has only one WS2812 light, so it’s 1D.
layout1d!(Layout,1); // Only one light

// If there are multiple lights forming a strip, you could write:

// layout1d!(Layout,60); // 60 lights
Initialize the ESP32S3 driver:
let ws2812_driver = {
        let data_pin = p.GPIO48;
        let rmt_clk_freq = hal::time::Rate::from_mhz(80);

        let rmt = hal::rmt::Rmt::new(p.RMT, rmt_clk_freq).unwrap();
        let rmt_channel = rmt.channel0;

        ClocklessDriver::default().with_led::<Ws2812>().with_writer(
            ClocklessRmtBuilder::default()
                .with_rmt_buffer_size::<{ Layout::PIXEL_COUNT * 3 * 8 + 1 }>()
                .with_led::<Ws2812>()
                .with_channel(rmt_channel)
                .with_pin(data_pin)
                .build(),
        )
    };
Initialize the LED controller:
let mut control = ControlBuilder::new_1d()
        .with_layout::<Layout, { Layout::PIXEL_COUNT }>()
        .with_pattern::<Rainbow>(RainbowParams {
            ..Default::default()
        })
        .with_driver(ws2812_driver)
        .with_frame_buffer_size::<{ Ws2812::frame_buffer_size(Layout::PIXEL_COUNT) }>()
        .build();
Set the LED color:
control.set_color_correction(blinksy::color::ColorCorrection { red: 0.5, green: 0.5, blue: 0.5 });The RGB values range from 0-1.
Set the LED brightness:
control.set_brightness(0.5); // Range is 0-1Then you can use it in a loop:
loop {
        let elapsed_in_ms = elapsed().as_millis();
        control.tick(elapsed_in_ms).unwrap();
    }
To achieve the same effect as the C implementation above, the complete code would be:
#![no_std]
#![no_main]
#![deny(
    clippy::mem_forget,
    reason = "mem::forget is generally not safe to do with esp_hal types, especially those \
    holding buffers for the duration of a data transfer."
)]
#![deny(clippy::large_stack_frames)]

use esp_alloc as _;
use esp_hal::{self as hal, delay::Delay};
use esp_hal::main;

use blinksy::{
    ControlBuilder,
    driver::ClocklessDriver,
    layout::Layout1d,
    layout1d,
    leds::Ws2812,
    patterns::rainbow::{Rainbow, RainbowParams},
};
use blinksy_esp::{rmt::ClocklessRmtBuilder, time::elapsed};

#[panic_handler]
fn panic(_: &core::panic::PanicInfo) -> ! {
    loop {}
}

extern crate alloc;

esp_bootloader_esp_idf::esp_app_desc!();

#[allow(
    clippy::large_stack_frames,
    reason = "it's not unusual to allocate larger buffers etc. in main"
)]
#[main]
fn main() -> ! {
    let cpu_clock = hal::clock::CpuClock::max();
    let config = hal::Config::default().with_cpu_clock(cpu_clock);
    let p = hal::init(config);

    // layout1d!(Layout, 60 * 5);
    layout1d!(Layout, 1);

    let ws2812_driver = {
        let data_pin = p.GPIO48;
        let rmt_clk_freq = hal::time::Rate::from_mhz(80);

        let rmt = hal::rmt::Rmt::new(p.RMT, rmt_clk_freq).unwrap();
        let rmt_channel = rmt.channel0;

        ClocklessDriver::default().with_led::<Ws2812>().with_writer(
            ClocklessRmtBuilder::default()
                .with_rmt_buffer_size::<{ Layout::PIXEL_COUNT * 3 * 8 + 1 }>()
                .with_led::<Ws2812>()
                .with_channel(rmt_channel)
                .with_pin(data_pin)
                .build(),
        )
    };

    let mut control = ControlBuilder::new_1d()
        .with_layout::<Layout, { Layout::PIXEL_COUNT }>()
        .with_pattern::<Rainbow>(RainbowParams {
            ..Default::default()
        })
        .with_driver(ws2812_driver)
        .with_frame_buffer_size::<{ Ws2812::frame_buffer_size(Layout::PIXEL_COUNT) }>()
        .build();
    control.set_color_correction(blinksy::color::ColorCorrection {
        red: 0.0,
        green: 0.0,
        blue: 1.0,
    });
    control.set_brightness(0.5); // Set initial brightness (0.0 to 1.0)

    let mut led_on_off = false;
    let delay = Delay::new();

    loop {
        if led_on_off {
            control.set_color_correction(blinksy::color::ColorCorrection {
                red: 0.0,
                green: 0.0,
                blue: 1.0,
            });
        } else {
            control.set_color_correction(blinksy::color::ColorCorrection {
                red: 0.0,
                green: 0.0,
                blue: 0.0,
            });
        }
        led_on_off = !led_on_off;
        let elapsed_in_ms = elapsed().as_micros();
        control.tick(elapsed_in_ms).unwrap();
        delay.delay_millis(500);
    }
}